How to Create a Password Protected Folder
By Davie | 21/Nov/2024
If you share your computer with others, there is always the chance that someone will either accidentally delete your stuff or otherwise mess with it. You can prevent that by password protecting it. If you would like to password protect a folder in Windows 10, here’s how you do it.

Whether you need to keep prying eyes out of your files or just want to stop people interfering with them, it is simple to protect what’s yours. Having to enter a password every time you access a folder may slow you down a bit but at least you know nobody can mess with it!
Password protect a folder in Windows 10
There are three ways you can password protect a folder in Windows 10 without using third party tools.
1. Navigate to the folder you want to protect.
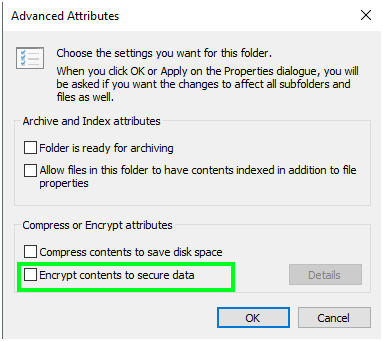
2. Right click it and select Properties and then Advanced.
3. Check the box that says ‘Encrypt contends to secure data’.
4. Back up your encryption key when prompted and keep it somewhere safe.
Or you can use a file compression tool such as WinZip or WinRAR to lock the folder. The downside is that you will either have to open it in memory or decompress it every time you want to use it. Holding the folder in memory is fine for images and documents but won’t work so well for programs.
1. Navigate to the folder you want to protect.
2. Right click it and select ‘compress’, ‘Add to archive’ or ‘zip’ depending on program what you have installed.
3. Create an archive with the lowest compression and select an encryption option.
4. Complete the creation process, the file will be created next to the file you want to protect.
5. Delete the original file once you’re happy everything has been archived.